ELF 실행파일에 대한 고찰 - shell
Android License Validator

Introduction
SO 라이브러리를 살펴보면서 다각도로 분석을 진행하다가 알게 된 validate 라는 문제에 대하여 알게되었다.
ELF 에 대한 Android Reverse Engineering 으로 제공되는 문제중 하나인데 이에 대한 write-up 을 작성해보려고 한다.
What is that
이를 위해 먼저 파일을 다운받는다.
1
2
$ adb push validate /data/local/tmp
validate: 1 file pushed, 0 skipped. 4.4 MB/s (9364 bytes in 0.002s)
디바이스로 파일을 배치시킨다.
1
2
3
$ adb shell
adb/ $ cd /data/local/tmp
adb/ $ chmod +x validate
해당 파일에 대하여 실행 권한을 부여한다.
1
2
adb/ $ ./validate
Usage: ./validate <serial>
인자 없이 실행하면 사용법을 출력한다.
1
2
adb/ $ ./validate qwerty
Incorrect serial (wrong format).
임의의 인자를 넘기면 잘못된 format 이라고 출력한다.
1
2
3
4
5
adb/ $ ./validate <Correct Serial>
Entering base32_decode
Outlen = 10
Entering check_license
Product activation passed. Congratulations!
올바른 인자를 넘길 경우 activation passed 라는 메세지를 보여준다.
Analysis
본격적으로 파일을 살펴보겠다.
1
2
3
4
5
00000000: 7f45 4c46 0101 0100 0000 0000 0000 0000  .ELF............
00000010: 0300 2800 0100 0000 bc03 0000 3400 0000  ..(.........4...
00000020: 2421 0000 0000 0005 3400 2000 0700 2800  $!......4. ...(.
00000030: 1600 1500 0600 0000 3400 0000 3400 0000  ........4...4...
00000040: 3400 0000 e000 0000 e000 0000 0400 0000  4...............
맨 위는 ELF header 인데 그중 offset 0x18 ~ 0x1B 까지가 entry point 에 대한 start address 를 나타낸다.
1
2
3
4
5
6
7
8
9
10
11
12
13
14
15
16
17
18
19
20
ELF Header:
  Magic:   7f 45 4c 46 01 01 01 00 00 00 00 00 00 00 00 00
  Class:                             ELF32
  Data:                              2's complement, little endian
  Version:                           1 (current)
  OS/ABI:                            UNIX - System V
  ABI Version:                       0
  Type:                              DYN (Shared object file)
  Machine:                           ARM
  Version:                           0x1
  Entry point address:               0x3bc    < -----------
  Start of program headers:          52 (bytes into file)
  Start of section headers:          8484 (bytes into file)
  Flags:                             0x5000000, Version5 EABI
  Size of this header:               52 (bytes)
  Size of program headers:           32 (bytes)
  Number of program headers:         7
  Size of section headers:           40 (bytes)
  Number of section headers:         22
  Section header string table index: 21
시작 주소는 0x3bc 로 확인된다.
1
2
3
4
5
6
7
8
9
10
11
12
13
14
15
void processEntry entry(void)

{
  dword *local_18;
  dword *local_14;
  dword *local_10;
  dword *local_c;

  local_18 = &__DT_PREINIT_ARRAY;
  local_14 = &__DT_INIT_ARRAY;
  local_10 = &__DT_FINI_ARRAY;
  local_c = &DWORD_00012eb4;
  __libc_init(&stack0x00000000,0,FUN_00011874,&local_18);
  return;
}
실제 어셈블리를 봤을 때 0x3BC 에 가보면 위와 같이 실행하는 코드를 확인할 수 있다. FUN_00011874 를 들어가본다.
1
2
3
4
5
6
7
8
9
10
11
12
13
14
15
16
17
18
19
20
21
undefined4 FUN_00011874(int param_1,int param_2)

{
  size_t sVar1;
  undefined4 out_length;
  undefined1 auStack_18 [16];

  if (param_1 != 2) {
    print_usage();
  }
  sVar1 = strlen(*(char **)(param_2 + 4));
  if (sVar1 != 0x10) {
    print_format_len();
  }
  puts("Entering base32_decode");
  FUN_00011340(0,*(undefined4 *)(param_2 + 4),0x10,auStack_18,&out_length);
  printf("Outlen = %d\n",out_length);
  puts("Entering check_license");
  FUN_00011760(auStack_18);
  return 0;
}
매개변수 갯수를 확인하고 넘어온 매개변수의 길이를 확인한다. 그리고 규격이 아닐 경우 다른 함수콜로 넘어간다.
1
2
3
4
5
6
void print_usage(void)

{
  puts("Usage: ./validate <serial>");
  exit(0);
}
사용방법을 호출힌 후 exit 하는 경우가 있으며
1
2
3
4
5
6
void print_format_len(void)

{
  puts("Incorrect serial (wrong format).");
  exit(0);
}
매개변수의 길이에 대한 오류를 출력하고 exit 하는 경우도 있다.
1
2
3
4
5
6
7
8
9
10
11
12
13
14
15
16
17
18
19
20
21
22
23
24
25
26
27
28
29
30
31
32
33
34
35
36
37
38
39
40
41
42
43
44
45
46
47
48
49
50
51
52
53
54
55
56
57
58
59
60
61
62
63
64
65
66
67
68
69
70
71
72
73
74
75
76
77
78
79
80
bool FUN_00011340(int *p_0,char *arg_string,uint 0x10_value,int param_4,int *p_out_length)

{
  char cVar1;
  int *piVar2;
  uint uVar3;
  int local_38;
  uint local_34;
  char *local_30;
  int *local_2c;
  int local_out_len;
  char *local_20;
  char local_19;
  char *local_18;
  int local_14;
  int local_10;
  char local_9;

  local_out_len = *p_out_length;
  piVar2 = p_0;
  if (p_0 == (int *)0x0) {
    piVar2 = (int *)0x0;
  }
  local_19 = (char)piVar2;
  if (p_0 != (int *)0x0) {
    local_19 = '\x01';
  }
  local_9 = '\0';
  local_10 = 0;
  local_38 = param_4;
  local_34 = 0x10_value;
  local_30 = arg_string;
  local_2c = p_0;
  if (local_19 != '\0') {
    local_10 = *p_0;
    uVar3 = 0x10_value;
    if (0x10_value != 0) {
      uVar3 = 0;
    }
    local_9 = (char)uVar3;
    if (0x10_value == 0) {
      local_9 = '\x01';
    }
  }
  while( true ) {
    while( true ) {
      local_14 = local_out_len;
      if ((local_10 == 0) && (local_9 != '\x01')) {
        while( true ) {
          local_14 = local_out_len;
          cVar1 = FUN_00010c08(local_30,local_34,&local_38,&local_out_len);
          if (cVar1 != '\x01') break;
          local_30 = local_30 + 8;
          local_34 = local_34 - 8;
        }
      }
      if ((local_34 == 0) && (local_9 != '\x01')) goto _EXIT;
      if ((local_34 == 0) || ((*local_30 != '\n' || (local_19 == '\0')))) break;
      local_30 = local_30 + 1;
      local_34 = local_34 - 1;
    }
    local_38 = local_38 + (local_out_len - local_14);
    local_out_len = local_14;
    local_20 = local_30 + local_34;
    if (local_19 == '\0') {
      local_18 = local_30;
    }
    else {
      local_18 = (char *)FUN_00010aa8(local_2c,&local_30,local_20,&local_34);
    }
    if ((local_34 == 0) || (((local_34 < 8 && (local_9 != '\x01')) && (local_19 != '\0')))) break;
    cVar1 = FUN_00010c08(local_18,local_34,&local_38,&local_out_len);
    if (cVar1 != '\x01') goto _EXIT;
    local_34 = (int)local_20 - (int)local_30;
  }
  local_34 = 0;
_EXIT:
  *p_out_length = *p_out_length - local_out_len;
  return local_34 == 0;
}
FUN_00011340 를 살펴보면 문자열에 대한 조합을 진행하는 것으로 보인다. OUT_PARAM 으로 p_out_length 에 주소를 넣는걸 볼 수 있다.
1
2
3
4
5
6
7
8
9
10
11
12
13
14
15
16
17
18
19
20
21
22
23
24
void FUN_00011760(byte *param_1)
{
  uint uVar1;
  byte local_20 [8];
  int local_18;
  byte *local_14;

  local_14 = param_1;
  for (local_18 = 0; local_18 < 5; local_18 = local_18 + 1) {
    local_20[local_18] = *local_14 ^ local_14[1];
    local_14 = local_14 + 2;
  }
  uVar1 = FUN_000116f0();
  if ((((local_20[0] == uVar1) && (uVar1 = FUN_0001170c(), local_20[1] == uVar1)) &&
      (uVar1 = FUN_000116f0(), local_20[2] == uVar1)) &&
     ((uVar1 = FUN_00011728(), local_20[3] == uVar1 &&
      (uVar1 = FUN_00011744(), local_20[4] == uVar1)))) {
    puts("Product activation passed. Congratulations!");
  }
  else {
    puts("Incorrect serial.");
  }
  return;
}
FUN_00011760 에서는 xor 연산을 진행한 뒤 다음 코드에서 하위적으로 조건을 확인한 다음 올바른 조건일 경우 Product activation passed. Congratulations! 라는 메세지를 그렇지 않을 경우 Incorrect serial. 라는 메세지를 출력한다.
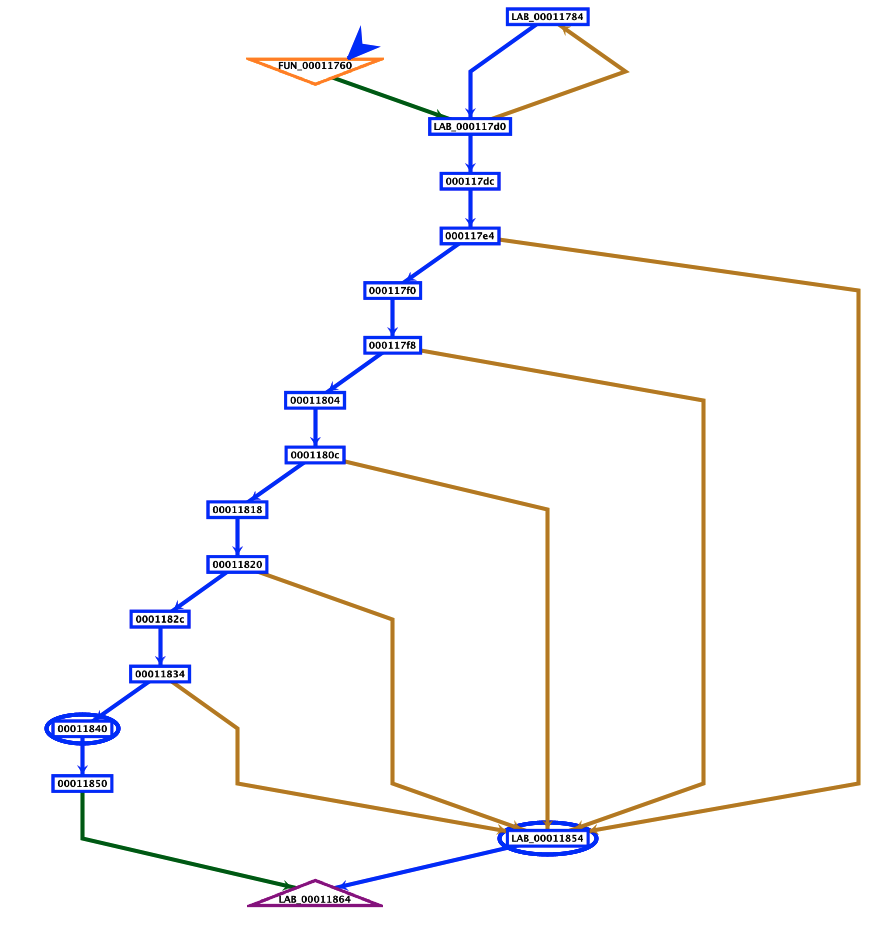 Call Flow for addr
함수 호출 시(0x1760) Product activation passed. Congratulations! 메시지를 출력하는 부분과(0x1840) Incorrect serial. 메세지를 출력하는 부분을(0x1854) 볼 수 있다.
눈치 챘을 수 있지만 조건문에서 필터링 하는 것을 보아 키는 하나만 가능한 것이 아니라 여러가지의 경우의 수가 다 만족할 수 있어 보인다.
1
2
3
4
5
6
7
8
9
10
11
12
13
14
15
16
17
18
19
20

                  { . . . }

        00011840 24 30 9f e5     ldr        r3,[DAT_0001186c]                                = 00000270h
        00011844 03 30 8f e0     add        r3=>s_Product_activation_passed._Congr_00011ab   = "Product activation passed. Co
        00011848 03 00 a0 e1     cpy        r0=>s_Product_activation_passed._Congr_00011ab   = "Product activation passed. Co
        0001184c c9 fa ff eb     bl         <EXTERNAL>::puts                                 int puts(char * __s)
        00011850 03 00 00 ea     b          LAB_00011864
                             LAB_00011854                                    XREF[5]:     000117ec(j), 00011800(j),
                                                                                          00011814(j), 00011828(j),
                                                                                          0001183c(j)
        00011854 14 30 9f e5     ldr        r3,[DAT_00011870]                                = 00000288h
        00011858 03 30 8f e0     add        r3=>s_Incorrect_serial._00011ae8,pc,r3           = "Incorrect serial."
        0001185c 03 00 a0 e1     cpy        r0=>s_Incorrect_serial._00011ae8,r3              = "Incorrect serial."
        00011860 c4 fa ff eb     bl         <EXTERNAL>::puts                                 int puts(char * __s)
                             LAB_00011864                                    XREF[1]:     00011850(j)
        00011864 08 d0 4b e2     sub        sp,r11,#0x8

                  { . . . }
이를 바이너리 위에서 보면 위와 같다.
The Game-Changer
이는 script 로 작성하여 진행하면 실행중에 나타날 수 있는 메모리 값을 Symbolic Execution 통해 유츄해볼 수 있다.
1
code_state = binary.factory.blank_state(addr=0x401760, add_options=options)
현재 실행하는 함수에 대한 시작 주소를 설정한다.
1
2
code_flow = binary.factory.simulation_manager(state)
code_flow.explore(find=0x401840, avoid=0x401854)
위에서 찾았던 passed 메세지와 Incorrect 메세지에 대한 offset addr 을 넣어준다.
그러면 실행했을 때 아래와 같은 문자열을 취득할 수 있다.
1
b'BRAE6AAMIBNAAIIA'
이때 찾아낸 문자열을 통하여 인자로 넘겨준다.
1
2
3
4
5
6
$ cd /data/local/tmp
$ ./validate BRAE6AAMIBNAAIIA
Entering base32_decode
Outlen = 10
Entering check_license
Product activation passed. Congratulations!
그리하면 위와 같이 키를 찾아낸 걸 볼 수 있다.
Conclusion
ELF 파일은 알면 알수록 흥미로운 대상이다. 디버깅이나 이슈 처리는 상당히 어렵지만 그만큼 탄탄하게 구조를 잡고 간다면 내부적으로는 강력한 실행 구조를 외부적으로 강인한 제품을 얻게되는 셈이다.
If you find any errors, please let me know by comment or email. Thank you.